Printing double-sided can save both paper and space. If you have a MacBook and a compatible printer, it’s easy to set up. To print double-sided on a MacBook, open the Print menu, select the ‘Two-Sided’ option, and choose how you want to flip the pages.
Make sure your printer has double-sided capabilities. Check the settings on your MacBook and ensure that your printer is connected. Once confirmed, you can start printing documents on both sides effortlessly.
Reading this article will teach you step-by-step how to use your MacBook for double-sided printing. Stay tuned for essential tips and solutions to common questions about printing on a Mac.
Simple Steps to Printing on Both Sides on Your Mac
Double-Sided Printing Made Easy
Before you start, make sure your printer can print on both sides of the paper (duplex printing). You can find this out by looking at your printer’s manual or checking the manufacturer’s website.
- Open your document: Open the document you want to print in any app.
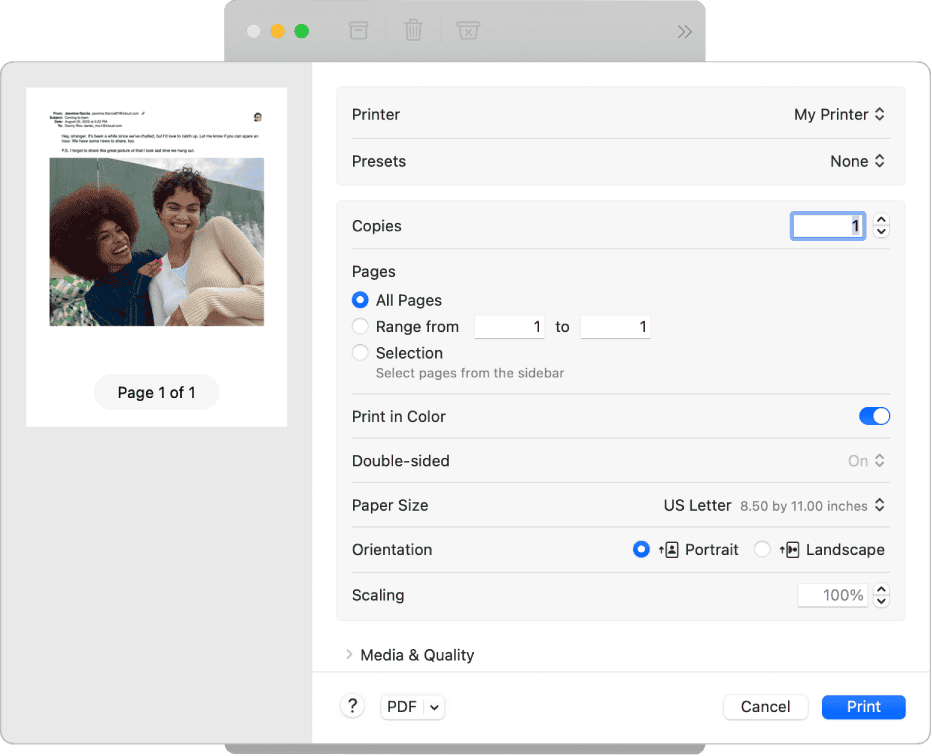
- Go to Print: Click “File” in the top menu bar and choose “Print.” Or, use the keyboard shortcut Command (⌘) + P.
- Print Settings: A print dialog box will appear. Look for the dropdown menu that shows the name of your printer or app. It might say “Copies & Pages” or something similar. Click this menu and choose “Layout.”
- Enable Two-Sided: In the Layout settings, you’ll see a “Two-Sided” option. Click it and choose either:
- Long-Edge binding: This is the most common option, where the paper is flipped along the long edge (like a book).
- Short-Edge binding: This flips the paper along the short edge (like a calendar).
- Print: Click “Print” and your Mac will send the document to the printer, automatically printing on both sides of the paper.
Troubleshooting Tips
If you’re having trouble, double-check these:
- Printer support: Make sure your printer supports duplex printing. Check the manual or online.
- Paper type: Use paper that is suitable for duplex printing. Some papers are too thick or may cause ink to smear.
- Driver update: Ensure that your printer driver is up to date.
Quick Reference Table
| Step | Action |
|---|---|
| 1. Open Document | Open the document you want to print. |
| 2. Go to Print | File > Print or Command (⌘) + P |
| 3. Print Settings | Click the dropdown menu (e.g., Copies & Pages) |
| 4. Enable Two-Sided | Choose Layout > Two-Sided > (Long-Edge or Short-Edge) |
| 5. Print | Click Print |
Additional Options
Some apps might have additional settings for double-sided printing. Look for options like “Duplex” or “Print on Both Sides” in the app’s print dialog.
By following these simple steps, you can save paper and reduce waste while printing your documents on your Mac.
Key Takeaways
- Confirm your printer supports double-sided printing.
- Open the Print menu on your MacBook to select the ‘Two-Sided’ option.
- Follow simple steps to efficiently print on both sides of the paper.
Preparing Your Mac for Double-Sided Printing
To print double-sided pages from a Mac, first check if your printer supports this feature. Then, adjust the settings on your Mac to enable double-sided printing.
Understanding Printer Compatibility
Before printing double-sided, ensure your printer supports this function. Most laser printers and many inkjet printers have this capability. To check, refer to the printer’s manual or the manufacturer’s website.
Next, connect the printer to the Mac. Open System Preferences and select Printers & Scanners. Click the “+” to add a new printer if not yet installed. Ensure the printer appears in the list of devices and is marked as AirPrint or double-sided capable. Update the printer drivers if necessary for better performance.
Configuring Printer Settings
Once your printer is connected, configure the settings for double-sided printing. Open the document you need to print.
Click File > Print. In the print dialog, find the Presets drop-down menu and select or create a new preset for double-sided printing.
Under Layout, choose Two-Sided. Select the appropriate option for binding, either Long Edge or Short Edge. Long Edge binds the pages like a book, whereas Short Edge is for flipping pages like a notebook.
Click Print to apply the settings. Make adjustments if needed to ensure the document prints correctly on both sides.
Frequently Asked Questions
Double-sided printing on a MacBook ensures you save paper and make your documents look professional. Here are some common questions and solutions about setting up and troubleshooting double-sided printing.
How can I enable double-sided printing on a MacBook Pro?
To enable double-sided printing, open your document and click File > Print. In the print dialog box, choose the Two-Sided option. You can select Long-Edge Binding or Short-Edge Binding depending on how you want the pages to flip. Click Print to finish.
What steps are needed to print double-sided documents using Mac Word?
Open your document in Word and go to File > Print. In the print settings, find the Copies & Pages drop-down and select Layout. Check the Two-Sided box and choose the binding option that suits you. Finally, press Print.
Why doesn’t the double-sided printing option appear on my MacBook?
If the double-sided option isn’t showing, your printer might not support duplex printing. Check your printer’s manual or specifications. Also, make sure your printer driver is up to date. Go to System Preferences > Printers & Scanners to update the driver.
How can I print a PDF with two-sided pages using a Mac?
Open the PDF in the Preview app. Click File > Print. In the print dialog, select Two-Sided from the print options. Choose your binding preference and click Print. Your PDF should now print on both sides of the paper.
What is the process for printing documents double-sided from Preview on a Mac?
Open your document in Preview. Choose File > Print. In the print dialog box, ensure the Two-Sided option is checked. Select your binding option, then click Print. The document will print double-sided.
Can I print two pages on one side of the paper on a MacBook, and if so, how?
Yes, you can. Open your document and go to File > Print. In the print menu, look for the Layout option. Choose the number of pages per sheet, such as 2. This will print two pages on one side of the paper. Click Print to complete.


