Setting up Wi-Fi on your printer is an important step for wireless printing. The Canon Pixma G3000 makes this process easy. It allows you to print from different devices without using cables. This is helpful at home or in the office, where having a printer set up wirelessly can be very convenient. Setting up your Canon Pixma G3000 printer for Wi-Fi is simple. You can connect your printer to your home or office network, so you can print from your computer, smartphone, or tablet.
You can do this quickly using WPS or the standard connection through the printer software. Before starting the Wi-Fi setup, check that the printer is plugged in, turned on, has ink cartridges installed, and has paper loaded into the tray. This helps prevent interruptions during setup. The Wi-Fi setup involves starting the connection on the printer and then connecting it to the network. You’ll need to interact with both the printer and the device you want to print from, usually through a direct wireless connection or a wireless router.

Effortless Wireless Printing with Your Canon Pixma G3000
Preparation: Gather Your Tools
Before diving into the setup, gather these essentials:
- Your Canon Pixma G3000 printer
- A computer or smart device with Wi-Fi capability
- Your Wi-Fi network name (SSID) and password
- The printer’s setup CD (optional)
Step 1: Power Up and Connect
Turn on your printer and ensure it’s connected to a power source. If you have the setup CD, insert it into your computer. If not, don’t worry; you can download the necessary software from Canon’s website.
Step 2: Install Printer Software
Follow the on-screen instructions to install the printer software. This software includes drivers and utilities that enable your computer to communicate with the printer. If you’re using a smartphone or tablet, download the Canon PRINT app from your device’s app store.
Step 3: Connect to Your Wi-Fi Network
There are two main ways to connect your Canon Pixma G3000 to Wi-Fi:
- WPS Connection (Push Button Method):
- Press and hold the Wi-Fi button on your printer until the ON lamp flashes.
- Press the WPS button on your router within two minutes.
- Wait for the Wi-Fi light on the printer to stop flashing and remain lit.
- Standard Connection:
- Open the printer software or Canon PRINT app.
- Select your printer from the list of available devices.
- Choose your Wi-Fi network and enter the password.
- Follow the on-screen instructions to complete the connection.
Step 4: Test Your Connection
Once connected, print a test page to verify that your printer is functioning properly over Wi-Fi. You can usually find the option to print a test page in the printer software or Canon PRINT app settings.
Troubleshooting Tips
If you encounter any issues during the setup process:
- Check your Wi-Fi connection: Ensure your computer or device is connected to the same Wi-Fi network as the printer.
- Restart your devices: Restarting your printer, computer, and router can sometimes resolve connectivity issues.
- Consult the manual: Refer to your printer’s user manual for detailed troubleshooting steps.
Key Takeaways
- The Canon Pixma G3000 printer offers convenient wireless printing once connected to Wi-Fi.
- Preparing your printer involves ensuring it is on with ink and paper ready before setup.
- The Wi-Fi setup process is a combination of actions on both the printer and the connecting device.
Preparing Your Printer for the Wi-Fi Setup
Before connecting your Canon Pixma G3000 to a wireless network, it’s important to understand the relevant terms and prepare the device properly. This ensures a smooth setup process.
Understanding Printer and Network Terminology
Familiarizing yourself with several key terms will make the Wi-Fi setup easier. Network Connection refers to the link between your printer and other devices through a Wireless Router. The SSID (Service Set Identifier) is your network’s name, and the Security Protocol protects your network’s information. Direct Connection Mode is when your printer connects to a device without a router, while Access Point Mode allows devices to connect through a router.
Getting the Printer Ready
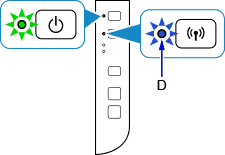
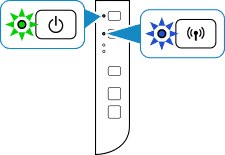
Before starting, make sure your Canon Pixma G3000 is plugged in and turned on. Check the On Lamp to confirm that the printer is active. The Wi-Fi Lamp should also be in focus: When it’s flashing, you’re ready to make the connection.
Connection Methods Overview
There are various ways to connect your Canon Pixma G3000. The Cableless Setup directly connects your printer to a device like a smartphone without using your wireless router. Alternatively, you can use a method where you press a button on your router to establish a connection. It’s also possible to go into the printer’s settings to manually input the Network Settings, such as the SSID and Security Protocol. Select the method that best fits your setup and network configuration.
Executing the Wi-Fi Setup Process
Setting up the Canon Pixma G3000 for Wi-Fi printing involves a few important steps. This section will walk you through the process from cableless setup to troubleshooting any connection issues.
Step-by-Step Cableless Setup
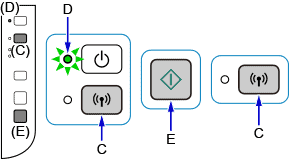
To start a cableless setup, ensure your printer and device have a stable internet connection. Begin by pressing the Wi-Fi button on your printer until the power lamp starts to flash. Then press the Color button followed by the Wi-Fi button. The Wi-Fi lamp should flash quickly and the power lamp should stay lit, showing that the printer is ready for the cableless setup.
Connecting Printer with Computer or Smartphone
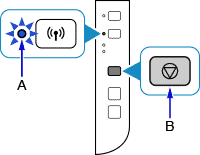
For direct connection to a computer or smartphone, use the printer’s Direct Connection function. Remember that using this method may disconnect your device from the internet. If your printer’s Wi-Fi lamp is flashing, press the Stop button to stabilize the connection before you proceed.
Finalizing the Connection and Troubleshooting
After establishing the wireless connection, return to your device to complete the setup. If you face any errors, check that the Wi-Fi lamp is still flashing quickly. Pressing the Black button can help diagnose the problem by printing a Network Configuration Page. If an error persists, use the manual for further troubleshooting steps or consult the manufacturer’s support page for specific guidance.
Frequently Asked Questions
Connecting your Canon Pixma G3000 printer to your Wi-Fi network allows you to print wirelessly from your computer, smartphone, or tablet. This section will guide you through common questions regarding the Wi-Fi setup process.
How can I connect my Canon Pixma G3000 to Wi-Fi on Windows 10?
To connect the Pixma G3000 to Wi-Fi on Windows 10, first ensure the printer is turned on. Access the printer’s Wi-Fi settings and select a connection method, like ‘Cableless setup’. Follow the on-screen instructions on your computer to complete the connection.
What are the steps to set up the Canon G3000 printer with Wi-Fi on a Mac?
On a Mac, start by turning on your Canon G3000 printer. Look for the wireless connection settings and go for a cableless setup, which avoids the need for cables. Once selected, use the guidance provided by the Mac’s software to finish setting up the Wi-Fi.
How do I connect my Canon G3000 printer to my Android device?
To connect the printer to an Android device, make sure the printer’s Wi-Fi is active. Use the Canon PRINT app available in the Play Store to link your printer with the device. The app will lead you through the necessary steps to establish the connection.
What is the process to reset the Wi-Fi settings on a Canon G3000?
Resetting Wi-Fi settings on your G3000 can be done by holding the Wi-Fi button on the printer until the alarm light blinks 21 times. Release the button, and the network settings will be reset, allowing you to start a new connection setup.
How do I print the network configuration page on a Canon G3000?
To print a network configuration page, turn on your printer and load paper. Press and hold the Wi-Fi button until the ON light flashes once. Then release the button, and the printer will print the page with the network information.
How can I change the Wi-Fi network on a Canon Pixma G3000 printer?
If you need to switch to a different Wi-Fi network, first reset the current network settings. Then, start the cableless setup again and follow the prompts to choose and connect to the new network from your device.