Renaming a printer in Windows 11 might seem like a small task, but it can make managing multiple devices much easier. Whether you’re organizing office equipment or just want a more recognizable name for your home printer, Windows 11 provides a straightforward process to make this change. To rename a printer in Windows 11, simply right-click on the printer device under the Printers section, select “Printer properties” from the context menu, and then change the name in the properties dialog box.
Many users don’t realize they can customize printer names to something more meaningful than the default manufacturer labels. This simple change can help prevent printing to the wrong device and make your system more organized. The process takes just a few clicks and doesn’t require any special technical knowledge or administrator permissions in most cases.
Why Rename a Printer in Windows 11?
If you have multiple printers—maybe one for documents, one for photos, or a shared office printer—having clear and distinct names can save you time and hassle. Instead of guessing which “HP1234” or “Brother5678” is which, renaming them helps you quickly select the right one. Whether you want to make your printer names more descriptive or just personalize them, Windows 11 makes it easy.
Method 1: Rename Your Printer Through Settings
This is the simplest and most direct way to rename a printer in Windows 11. Here’s how:
1. Open Settings
- Click the Start button or press Windows + I to open the Settings app.
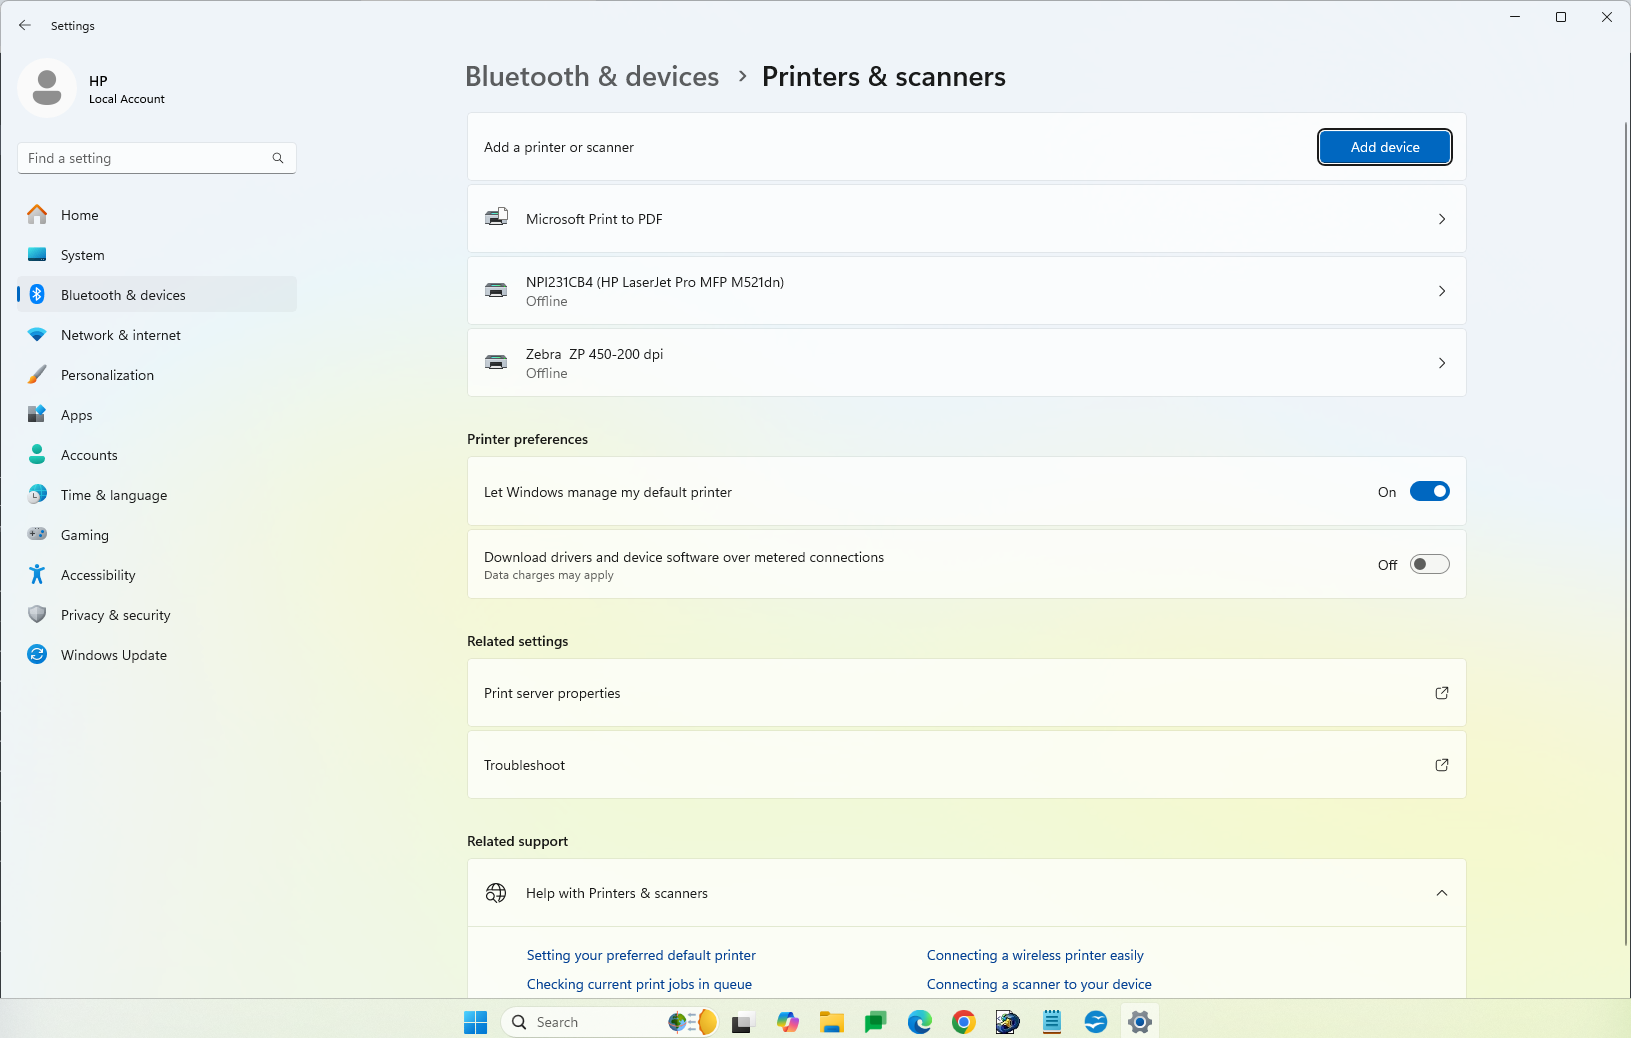
2. Navigate to Printers & Scanners
- In the sidebar, select Bluetooth & devices.
- Click Printers & scanners.
3. Choose the Printer You Want to Rename
- You’ll see a list of all printers connected to your device.
- Click on the printer you’d like to rename.
4. Rename the Printer
- Under the printer’s name, click Printer properties.
- In the General tab, you’ll see the current name of the printer.
- Delete the existing name and type in a new one that makes sense for you. For example, “Office LaserJet” or “Color Photo Printer.”
- Click Apply, then OK to save the changes.
Now your printer will show up with its new name whenever you print.
Method 2: Rename a Printer Using Control Panel (Alternative Option)
For those who prefer the classic Control Panel approach—or if Settings doesn’t offer enough control—this method works just as well.
1. Open Control Panel
- Press Windows + R, type
control, and press Enter.
2. Go to Devices and Printers
- Click Hardware and Sound, then Devices and Printers.
3. Select and Rename Your Printer
- Right-click the printer you want to rename and choose Printer properties.
- Under the General tab, edit the printer name.
- Click Apply, then OK to finalize the change.
This renames the printer just like in the Settings app, and it can be useful if you’re managing older printers or drivers.
Method 3: Rename a Printer Using Windows PowerShell (For Advanced Users)
If you’re comfortable with command-line tools or managing multiple printers remotely, PowerShell is another quick way to rename a printer.
1. Launch Windows PowerShell as Administrator
- Press Windows + X and select Windows Terminal (Admin) or PowerShell (Admin).
2. List All Installed Printers
- Type the following command and press Enter:
Get-Printer
This displays all the printers on your system, along with their current names.
3. Rename the Printer
- Use this command to rename your printer:
Rename-Printer -Name "CurrentPrinterName" -NewName "NewPrinterName"
For example:
Rename-Printer -Name "HP LaserJet Pro" -NewName "Office Laser Printer"
- Press Enter, and your printer is renamed instantly.
This method is particularly helpful for IT administrators managing printers across multiple machines.
A Few Tips for Renaming Printers
- Be Descriptive: Name your printer something that reflects its function or location, like “Reception Desk Printer” or “Upstairs Color Printer.”
- Avoid Special Characters: Stick to letters, numbers, spaces, and dashes to avoid any potential compatibility issues.
- Consistent Naming in Shared Environments: If multiple users share printers on a network, consistent and intuitive names can prevent confusion.
Wrapping Up
Renaming a printer in Windows 11 is a quick tweak that can make your day-to-day printing tasks much smoother. Whether you’re organizing devices in a busy office or just want a clearer name for your home printer, these simple steps help keep things neat and easy to manage. Take a moment to rename your printers today—you’ll be glad you did the next time you hit “Print.”
Key Takeaways
- Renaming a printer in Windows 11 requires just right-clicking the printer and accessing its properties.
- Custom printer names help better organize and identify multiple devices in your printing setup.
- The name change takes effect immediately without requiring a system restart or additional configuration.
Understanding Printer Renaming in Windows 11
Windows 11 makes it easy to rename printers for better organization. Renaming printers helps users identify specific devices, especially when managing multiple printers in an office or home setting.
When you connect several printers to your Windows 11 computer, they often have default names that may be confusing. These names might include model numbers or random characters that don’t clearly indicate their location or purpose.
Changing these names to something more meaningful can save time and reduce errors. For example, renaming printers to “Office Printer,” “Color Printer,” or “Basement Printer” makes it immediately clear which device you’re selecting.
Windows 11 offers multiple methods to rename printers:
- Through Settings app
- Using Control Panel
- Via Command Prompt
- With PowerShell
The most straightforward approach is through Settings. Simply navigate to Bluetooth & Devices > Printers, select your printer, and choose “Printer properties” to change the name.
Renamed printers will display their new names throughout Windows, including in print dialogs and printer lists. This makes selecting the right printer much easier when printing documents.
IT administrators often use printer renaming to implement naming conventions across an organization. This creates consistency and improves workflow efficiency.
Preparation for Printer Renaming Process
Before changing your printer’s name in Windows 11, several preparatory steps will ensure the process goes smoothly. These steps help prevent technical issues and make the rename process faster.
Checking Printer Connectivity
First, verify that your printer is properly connected to your computer or network. For wired printers, check that the USB or ethernet cable is securely plugged in at both ends.
For wireless printers, confirm that both the printer and computer are connected to the same WiFi network. You can check this in Windows 11 by clicking the network icon in the taskbar and viewing your current connection.
If the printer shows as “Offline” in Windows settings, try turning it off and on again. Sometimes a simple power cycle resolves connectivity issues.
Quick connectivity check:
- Ensure printer is powered on
- Verify cables are connected (for wired printers)
- Confirm network connection (for wireless printers)
- Print a test page to verify communication
Verifying Printer Installation
Make sure your printer is properly installed in Windows 11 before attempting to rename it. Open Settings by pressing Win+I, then navigate to Bluetooth & devices > Printers & scanners.
Your printer should appear in the list of installed devices. If it doesn’t show up, you’ll need to add it first before you can rename it.
To add a missing printer:
- Click “Add device” at the top of the Printers & scanners page
- Wait for Windows to detect available printers
- Select your printer from the list and follow the installation prompts
If Windows doesn’t automatically find your printer, you might need to download and install drivers from the manufacturer’s website.
Ensuring User Account Control
To rename a printer in Windows 11, you need administrative privileges. Make sure you’re logged in with an administrator account before starting the renaming process.
If you’re using a standard user account, you’ll need to provide administrator credentials when prompted. This typically appears as a User Account Control (UAC) dialog box asking for permission.
You can check your account type by going to:
- Settings > Accounts > Your info
- Look under your name to see if it says “Administrator”
For organizational environments, contact your IT department if you don’t have admin rights. They might need to rename the printer for you or grant temporary administrative privileges.
In some network environments, printer names may be controlled by a print server. If this is the case, changes might need to be made at the server level rather than on your local machine.
Accessing Printer Properties
Before renaming your printer in Windows 11, you need to access the printer properties. There are two main methods to do this: through the Control Panel or using Windows Settings.
Navigating to Control Panel
To access printer properties through Control Panel, start by clicking the Windows Start button. Type “Control Panel” in the search bar and select it from the results.
Once Control Panel opens, change the view to “Category” if it isn’t already. Then select “Hardware and Sound” followed by “Devices and Printers.”
In the Devices and Printers window, locate the printer you want to rename. Right-click on it to open a context menu. From the menu, select “Printer properties.”
This will open a properties dialog box with several tabs. The printer name appears in the “General” tab, which is typically the default tab when you open printer properties.
Utilizing Windows Settings
The Windows Settings app offers a more modern interface for accessing printer properties. Begin by pressing the Windows key + I keyboard shortcut to open Settings.
From the Settings menu, select “Bluetooth & devices” from the left sidebar. Then click on “Printers & scanners” to view all connected printers.
Find the printer you wish to rename in the list and click on it. This will expand options for that specific device. Click the “Printer properties” button to open the properties dialog.
The properties window that appears is identical to the one accessed through Control Panel. Navigate to the “General” tab if it’s not already selected to find the printer name field.
Steps to Rename a Printer
Renaming a printer in Windows 11 is straightforward and can be done in a few simple steps. You can give your printer a more recognizable name to easily identify it among multiple devices connected to your system.
Opening Printer Properties
To begin the process, you need to access the printer properties in Windows 11. First, open the Settings app by pressing the Windows key + I on your keyboard. Then navigate to “Bluetooth & devices” from the left menu panel. Select “Printers & scanners” to see a list of all printers connected to your computer.
Find the printer you want to rename in this list. Click on the printer to expand its options. You’ll see several buttons appear below the printer name. Click on “Printer properties” to open a new window with detailed settings for your selected printer.
Alternatively, you can access printer properties through the Control Panel. Type “Control Panel” in the Windows search bar, open it, and navigate to “Devices and Printers.” Right-click on the printer you want to rename and select “Printer properties” from the context menu.
Changing the Printer Name
Once the Printer Properties window opens, you’ll see several tabs at the top. Make sure you’re on the “General” tab, which appears first by default. This tab contains basic information about your printer, including its current name.
Look for the name field near the top of the window. It will display the current printer name in an editable text box. Simply click inside this text box and delete the existing name.
Type your preferred new name for the printer. Choose something descriptive that helps you easily identify this printer. For example, “Office LaserJet” or “Kitchen HP Printer” might be more helpful than the default model number.
Note: Make sure you have administrative privileges to change printer names. If you’re using a work computer, you might need to contact your IT department.
Applying and Saving Changes
After entering the new printer name, you need to save your changes. Look for the “Apply” button near the bottom of the Printer Properties window and click it. This will apply your new name to the printer while keeping the window open.
To finalize the change, click the “OK” button to close the Printer Properties window. The printer should now appear with its new name throughout Windows 11.
If you’re using PowerShell, you can also rename a printer with this command:
Rename-Printer -Name "CURRENT-PRINTER-NAME" -NewName "NEW-PRINTER-NAME"
Your printer will now display the new name in all Windows locations, including the print dialog when you’re printing documents. This makes it easier to select the right printer, especially if you have multiple similar devices connected to your computer.
Verifying the Printer Name Change
After renaming your printer in Windows 11, it’s important to verify that the change took effect. This simple step ensures your new printer name is properly saved in the system.
The easiest way to confirm the name change is to return to the Settings app. Go to Settings > Bluetooth & devices > Printers & scanners and check if your printer appears with its new name in the list.
You can also verify the change through the Control Panel. Here’s how:
- Press Win + R to open the Run dialog
- Type “control” and press Enter
- Select Hardware and Sound
- Click on Devices and Printers
Your printer should be displayed with its new name in this window. If you still see the old name, try refreshing the page or restarting your computer.
Some applications might still display the old printer name until you restart them. If you’re trying to print from a program and don’t see the updated name, close and reopen the application.
For network printers, other computers on your network might need time to recognize the name change. In some cases, you may need to remove and reconnect to the printer on other devices to see the updated name.
Troubleshooting Common Issues
When renaming printers in Windows 11, users may encounter several obstacles that prevent successful name changes. These typically involve permission restrictions or problems with the system detecting the printer properly.
Resolving Permission Errors
Permission errors often occur when trying to rename a printer in Windows 11. This happens because the user account may not have administrative privileges required to make system changes.
To fix this issue, right-click on the Start menu and select “Run as administrator” when opening Settings. This ensures the printer management interface operates with proper permissions.
If the error persists, try using Command Prompt with admin privileges:
- Press Win + X and select “Windows Terminal (Admin)”
- Type
printui /s /t2and press Enter - Select the printer and rename it through this interface
Some users report success after running the System File Checker. Open Command Prompt as administrator and type sfc /scannow to repair any corrupted system files that might be causing the renaming error.
Addressing Printer Detection Problems
After renaming a printer, Windows 11 sometimes loses connection to the device. This occurs because the system might still reference the old printer name in various configuration files.
Try these solutions:
- Restart the Print Spooler service: Press Win+R, type
services.msc, find “Print Spooler,” right-click and select Restart - Reconnect the printer: Disconnect and reconnect the printer, either physically or from the network
- Update printer drivers: Go to Settings > Bluetooth & devices > Printers & scanners, select the printer and choose “Update driver”
For network printers, check that all computers on the network recognize the new name. Sometimes rebooting both the printer and computer resolves detection issues by refreshing all connection parameters.
Frequently Asked Questions
Renaming printers in Windows 11 can be done through several methods including Settings, Control Panel, and even Command Prompt. These questions address common situations users encounter when trying to change printer names.
What are the steps to change a printer’s name in the Windows 11 operating system?
To rename a printer in Windows 11, users can open Settings by pressing Win+I. Then they should navigate to Bluetooth & devices > Printers & scanners.
From there, they need to click on the printer they want to rename and select “Printer properties.” In the properties window, they can simply type a new name in the text field and click “Apply” followed by “OK” to save the changes.
Another method involves using Control Panel. Users can search for “Control Panel” in the Start menu, go to Hardware and Sound > Devices and Printers, right-click the printer, and select “Printer properties” to change the name.
How can I modify a printer’s name when it is shared on a network in Windows 11?
To rename a shared printer, the user must have administrator privileges on the computer where the printer is physically connected or shared from. They should log in to that computer first.
Once logged in, they can rename the printer using the Settings app or Control Panel as described above. After changing the name, the new printer name will be visible to other network users.
Network users may need to reconnect to the printer with its new name. They might have to remove the old printer connection and add the newly named printer from network shares.
Is it possible to update the printer name for all users on a multi-user system in Windows 11?
Yes, but this requires administrator privileges. When an administrator renames a printer, the change typically applies system-wide for all users.
To ensure the change affects everyone, the administrator should make the change while logged in with an administrator account. The printer should be renamed using the Control Panel method rather than Settings.
In some complex network environments, Group Policy can be used to push printer configurations to all users. This ensures consistent printer naming across the entire organization.
What procedure should be followed to alter the name of an HP printer connected to a Windows 11 network?
For an HP printer, start by ensuring the printer drivers are up to date through the HP website or Windows Update. Then rename the printer through Windows 11 Settings or Control Panel.
If the HP printer has a web interface, users might also be able to change some settings through the printer’s IP address. Enter the printer’s IP address in a browser and log in to access advanced settings.
After renaming, users should run a test print to confirm the new name appears correctly in the print dialog and print queue. This verifies the change was successful.
Why am I unable to rename my printer in Windows 11, and how can this issue be resolved?
Common reasons for being unable to rename a printer include insufficient permissions, the printer being in use, or software conflicts. First, ensure you’re using an administrator account.
If the printer is busy, cancel all print jobs in the queue and try again. Sometimes closing and reopening the Settings app or Control Panel can resolve temporary glitches.
For persistent issues, try restarting the Print Spooler service. Search for “Services” in the Start menu, find “Print Spooler,” right-click it, and select “Restart.” Then attempt to rename the printer again.
In Windows 11, how does one set or update the default printer to ensure it retains the new name?
After renaming a printer, users can set it as the default by going to Settings > Bluetooth & devices > Printers & scanners. Then they should click on “Printer preferences.”
In the preferences window, users can find the newly named printer, right-click it, and select “Set as default printer.” A checkmark will appear next to the default printer.
Users can also disable Windows’ automatic default printer management by toggling off “Let Windows manage my default printer” in printer settings. This ensures their chosen default printer remains selected even after connecting to new printers.