Sharing a printer in Windows can be a convenient way to allow multiple users or devices to access the same printing resource without the need for physical wiring or direct connections. Whether in a home setting with multiple family members or an office environment with various employees, setting up printer sharing is a straightforward process that can lead to increased efficiency and resource management.
In Windows, the steps to share a printer are easy to follow. They include accessing printer settings through the control panel or system settings, modifying sharing options, and allowing other computers on the same network to connect to the printer. With these steps complete, anyone connected to the network can print documents without needing to connect directly to the printer.
Sharing Your Printer: A Guide for Windows Users

Sharing Your Printer
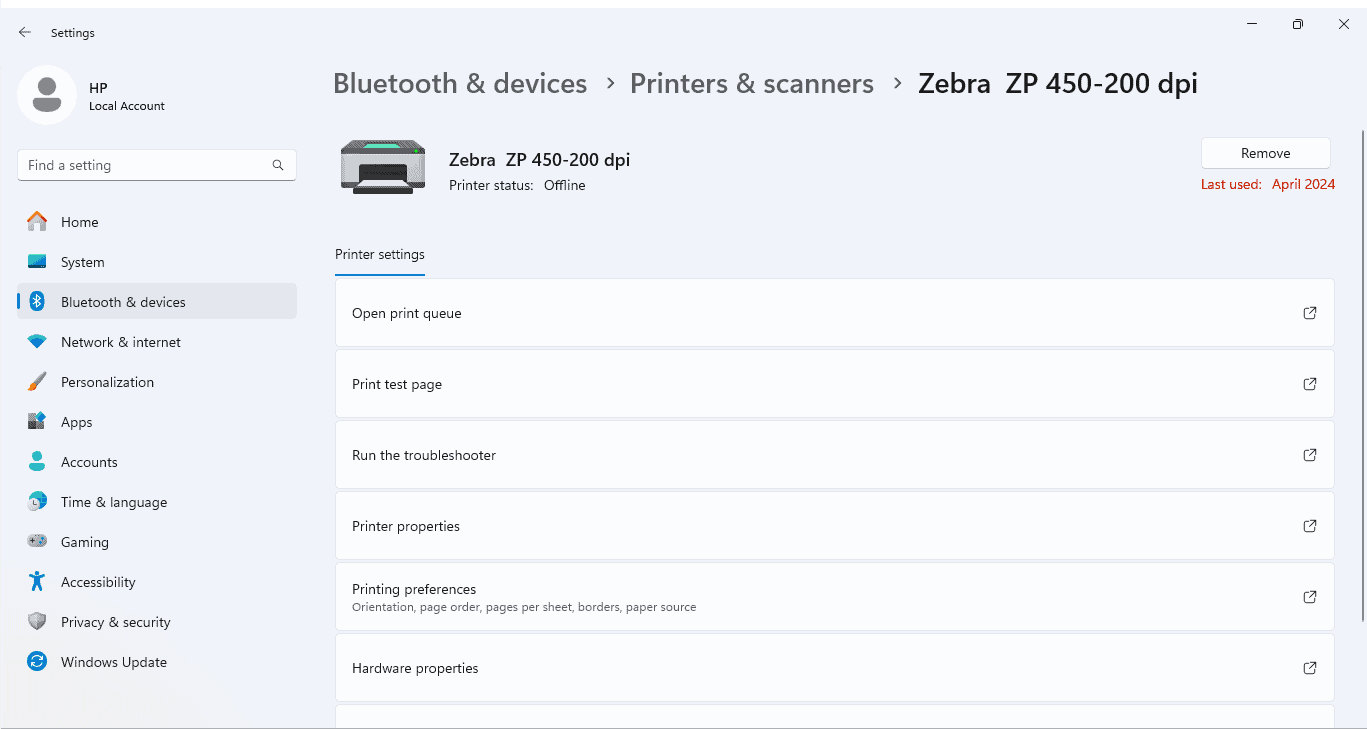
Let’s get this done! Sharing a printer on your Windows network is easier than you think. First, ensure your printer is connected and turned on. Then, click on the Start button and type “printers & scanners.” Click on the Printers & Scanners setting when it pops up. Find your printer in the list and select “Manage.”
Opening Printer Properties

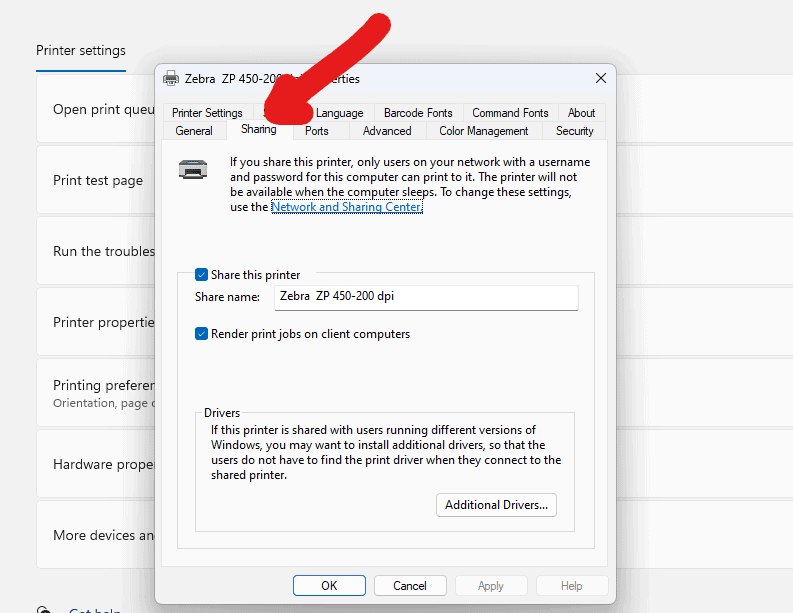
In the printer’s manage window, you’ll see several options. Click on “Printer Properties” to open a new window. Look for the “Sharing” tab at the top of that window and give it a click.
Sharing the Printer

In the Sharing tab, check the box that says “Share this printer.” Feel free to change the printer’s name if you like. Something short and easy to remember is always helpful. After that, just click “OK” and you’re done! Your printer is now shared on the network.
Troubleshooting Tips
| Problem | Solution |
|---|---|
| Can’t find the “Sharing” tab | Make sure you’re in “Printer Properties,” not “Printer Preferences.” |
| Other computers can’t find the printer | Double-check network settings and ensure Network Discovery is on. |
| Printing is slow or documents get stuck | Update printer drivers and restart both the printer and your computer. |
This is a basic guide to sharing a printer in Windows. For more advanced options or troubleshooting, refer to Microsoft’s support resources.
Key Takeaways
- Sharing a printer in Windows allows multiple users to access the same printer.
- The process involves changing settings to permit network users to print.
- Following a few simple steps can help improve efficiency in printer access.
Setting Up Printer Sharing in Windows
Printer sharing in Windows allows multiple computers to print to a single printer over a network. This feature saves costs and simplifies printer management.
Accessing Printer Properties
To share a printer, first ensure it connects to the primary computer via USB or Wi-Fi. Open the Settings app. Navigate to Devices and select Printers & Scanners. Choose the printer to share and click Manage. Find Printer properties to view more settings.
Configuring Sharing Settings
In the printer properties window, click the Sharing tab. Tick the Share this printer box to enable sharing. Assign a share name for the network printer. This name helps users on different computers find the printer on the network.
Managing Printer Access
Manage who can use the shared printer through the Security tab in printer properties. You can set permissions for different users or groups, allowing specific access levels. Permissions ensure only authorized users print documents.
Troubleshooting Common Issues
If other computers cannot see the shared printer, check the network settings. Ensure the primary PC has file and printer sharing enabled. Verify all computers are on the same workgroup or network domain. Make sure the correct printer driver is installed on client computers. If issues persist, restarting both the primary PC and the client computer often helps.


